Ora che anche il caro Google Optimizeci ha lasciati, quella che troverai in questa guida è una validissima alternativa gratuita che puoi studiare e applicare subito nei tuoi progetti.
Finora, nelle guide che ho creato, abbiamo visto tantissime robe fighe che si possono fare con Google Tag Manager.
Oggi vedremo di fare qualcosa per cui Tag Manager non è stato progettato. Sì, hai capito bene. In questo articolo ti dimostrerò che non solo è possibile, ma non è nemmeno difficile, creare degli A/B test con Google Tag Manager.
Si tratta di pochi semplici passaggi, ma che ti permetteranno di creare i tuoi esperimenti, senza l’utilizzo di strumenti costosi, come Visual Web Optimizer.
Per qualsiasi dubbio ti aspetto nei commenti qui sotto: io e il mio team saremo felice di aiutarti 😉
Ora non ti resta che indossare il tuo cappello da Digital Analyst e seguirmi 😎
STEP 1 – IDENTIFICA E CREA LA VARIANTE
Per questa guida, ti servirà una variante dell’elemento che andrai a testare.
Cerco di spiegarmi meglio.
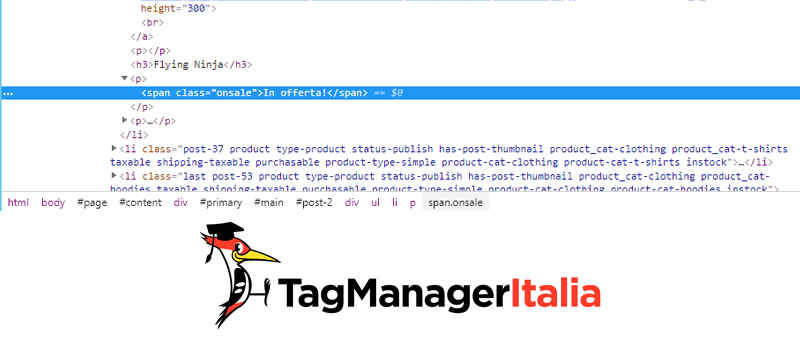
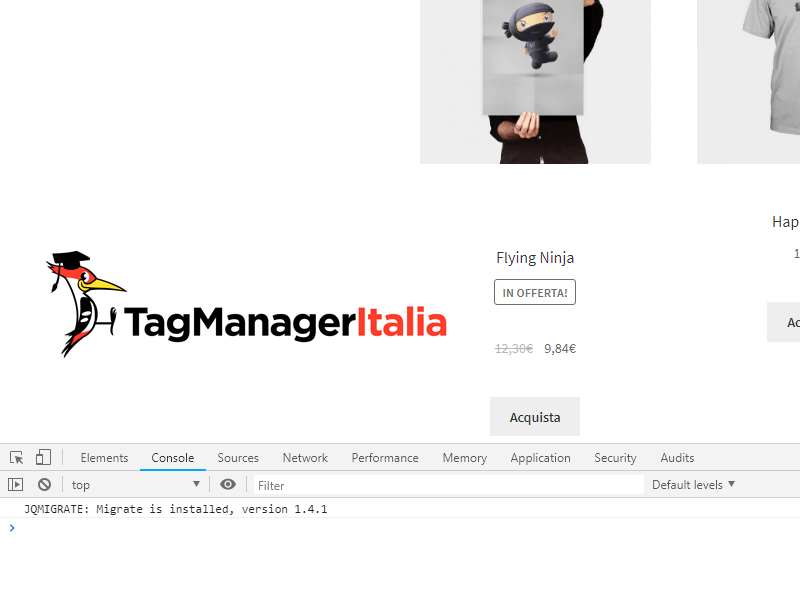
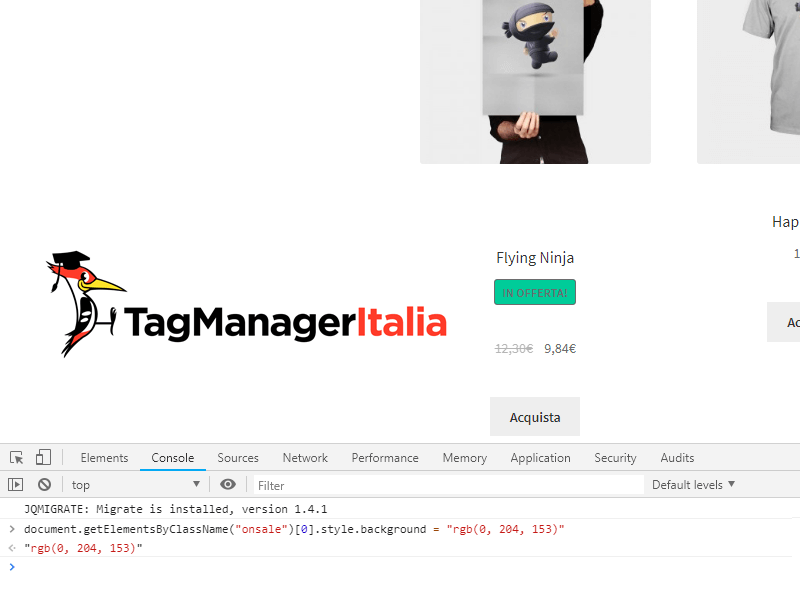
Ti faccio un esempio: voglio cambiare il colore del pulsante “In Offerta!” del mio e-commerce, perché sono convinto che con un colore più acceso, l’utente sia più invogliato a cliccarci sopra.
Nel mio caso il pulsante “In Offerta!” ha una classe “onsale“, e dal momento che il mio obiettivo è quello di cambiare colore dello sfondo in un bel verde, andrò all’interno della console (strumenti per sviluppatori) e inserirò il seguente codice:
Io ho utilizzato il modello RGB per modificare il colore, ma tu puoi anche scrivere semplicemente “green”.
Come puoi vedere dalle immagini del prima e dopo, grazie a quel pezzo di codice, il mio pulsante è cambiato.
Ora applichiamo la variante di colore:
Questa modifica è solo temporanea però (se ricarichi la pagina, tutto scompare e torna come prima), se voglio creare per davvero il mio A/B test, dovrò fare delle successive implementazioni.
STEP 2 – CREA L’ATTIVATORE
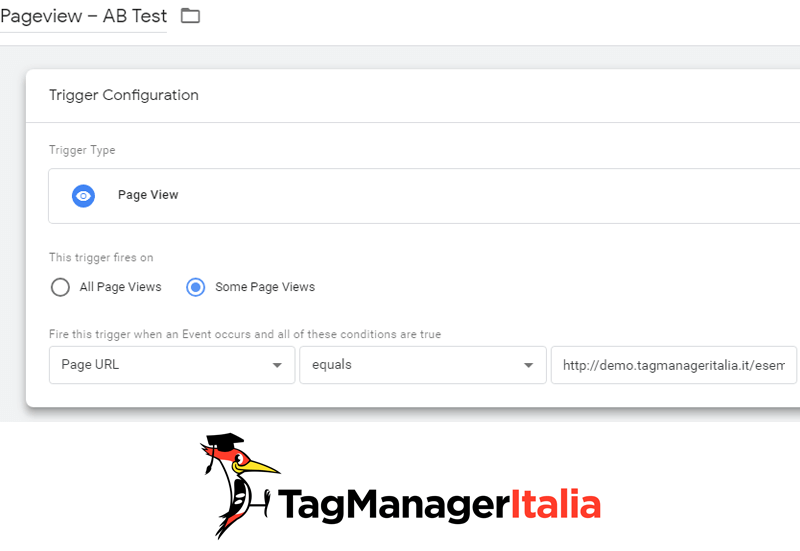
La prima cosa da fare è quella di creare un Attivatore per l’A/B test. Nel mio caso il pulsante è all’interno dell’Home Page, quindi farò così:
Nuovo Attivatore.
Tipo di Attivatore:Visualizzazione di pagina.
Questo Attivatore si abilita su: “Page URL” è uguale a http://demo.tagmanageritalia.it/esempio/ (qui dovrai inserire la tua pagina).
Nominalo:“Pageview – AB Test”.
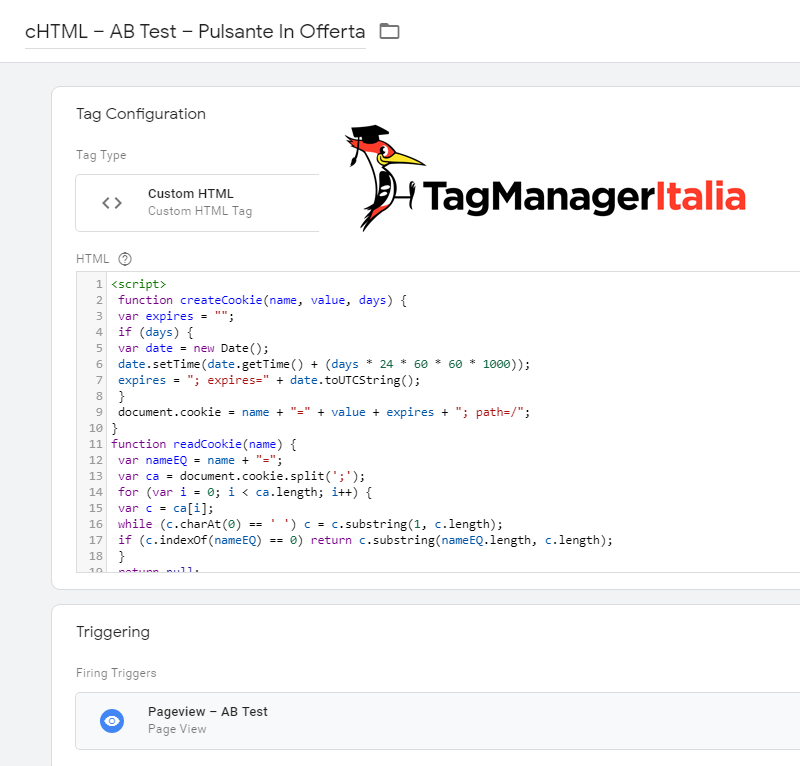
STEP 3 – CREARE HTML PERSONALIZZATO
Soliti passaggi, ormai dovresti saperlo a memoria come creare un Tag, no? Vabbè dai, facciamo finta che non li conosciamo e li ripetiamo 😛
Vai nella sezione Tag > Nuovo > HTML personalizzato.
Incolla questo script:
<script>
 function createCookie(name, value, days) {
 var expires = "";
 if (days) {
 var date = new Date();
 date.setTime(date.getTime() + (days * 24 * 60 * 60 * 1000));
 expires = "; expires=" + date.toUTCString();
 }
 document.cookie = name + "=" + value + expires + "; path=/";
}
function readCookie(name) {
 var nameEQ = name + "=";
 var ca = document.cookie.split(';');
 for (var i = 0; i < ca.length; i++) {
 var c = ca[i];
 while (c.charAt(0) == ' ') c = c.substring(1, c.length);
 if (c.indexOf(nameEQ) == 0) return c.substring(nameEQ.length, c.length);
 }
 return null;
}
function createABtest() {
 var randomChange = randomNumber % variants.length;
 createCookie(prefix + '-cookie', variants[randomChange], 9);
 if (variants[randomChange] != "0") {
 var newcookie = variants[randomChange].split('.');
 var changeID = newcookie[0];
 var variantID = newcookie[1];

changes[changeID]['variants'][variantID].execute();
 sendDimension(changeID, variantID);
 } else {
 sendDimension(0)
 }

}
function sendDimension(changeID, variantID) {
 if (readCookie('_ga')) {
 if (changeID != 0) {
 dataLayer.push({ 'event':'abTest', 'eventCategory': 'ab-test', 'eventAction': prefix + '-' + changeID + '-' + variantID, 'eventLabel': prefix + '-' + changeID + '-' + variantID, 'eventNonInteraction': 1 });
 } else {
 dataLayer.push({ 'event':'abTest', 'eventCategory': 'ab-test', 'eventAction': prefix + '-0-0', 'eventLabel': prefix + '-0-0', 'eventNonInteraction': 1 });
 }
 }
}
function checkCookie(name) {
 ca = document.cookie.split(';');
 for (var i = 0; i < ca.length; i++) {
 var c = ca[i];
 while (c.charAt(0) == ' ') c = c.substring(1, c.length);
 if (c.indexOf(name) > -1) return true;
 }
 return false;
}
function eraseCookie(name) {
 createCookie(name, "", -1);
}

var prefix = 'tmi';
var randomNumber = {{Random Number}};
var changes = {
 1: {
 variants: {
 1: {
 execute: function () {
document.getElementsByClassName("onsale")[0].style.background = "rgb(0, 204, 153)"

}
 }
 }
 }
};
var variants = ["0"];
for (var j in changes) {
 for (var x in changes[j]['variants']) {
 variants.push(j + '.' + x);
 }
}
if (readCookie(prefix + '-cookie')) {
 if (variants.indexOf(readCookie(prefix + '-cookie')) != -1) {
 var currentCookie = readCookie(prefix + '-cookie').split('.');
 var currentChangeID = currentCookie[0];
 var currentVariantID = 0;
 if (currentChangeID != 0) {
 currentVariantID = currentCookie[1];
 changes[currentChangeID]['variants'][currentVariantID].execute();
 }
 sendDimension(currentChangeID, currentVariantID);
 } else {
 eraseCookie(prefix + '-cookie');
 createABtest();
 }
} else {
 createABtest();
}
 </script>
Aggiungi l’Attivatore che hai creato prima:“Pageview – AB Test”.
Salva con il nome:“cHTML – AB Test – Pulsante In Offerta”.
È un po’ lunghetto, lo so, ma non lasciarti spaventare 😉 Come puoi vedere dallo script, io ho inserito la mia riga di codice che avevo testato all’interno della console, tu dovrai inserire la tua.
Tutto questo servirà, oltre che per creare l’A/B test, per assegnare un cookie all’utente che ha visualizzato una determinata variante, e fare in modo che continui a visualizzare sempre la stessa, anche nelle sessioni future. Non vorrai mica confonderlo mostrandogli ogni volta una cosa diversa, no? 😉
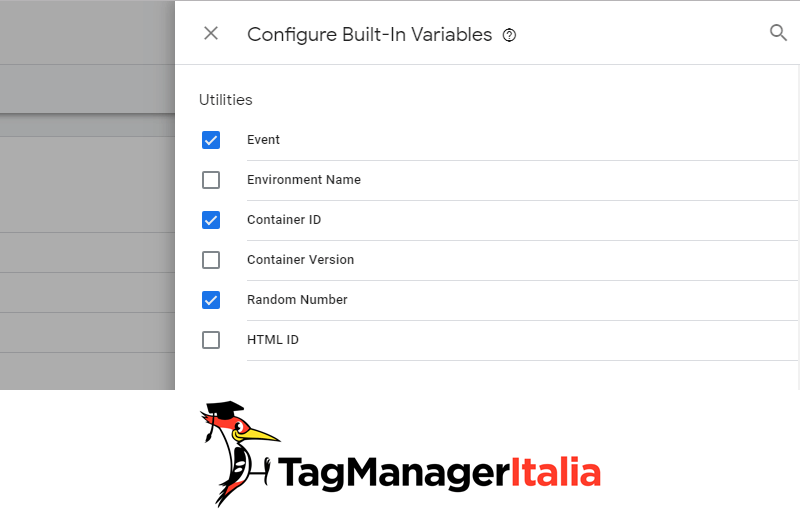
STEP 4 – CONFIGURA LA VARIABILE “RANDOM NUMBER”
Abbiamo inoltre usato la Variabile integrata{{Random Number}} che non fa altro che indicare un numero casuale.
Questo è uno step semplicissimo, ti basta fare così:
Ormai è quasi fatta, sei pronto per lanciare il tuo esperimento.
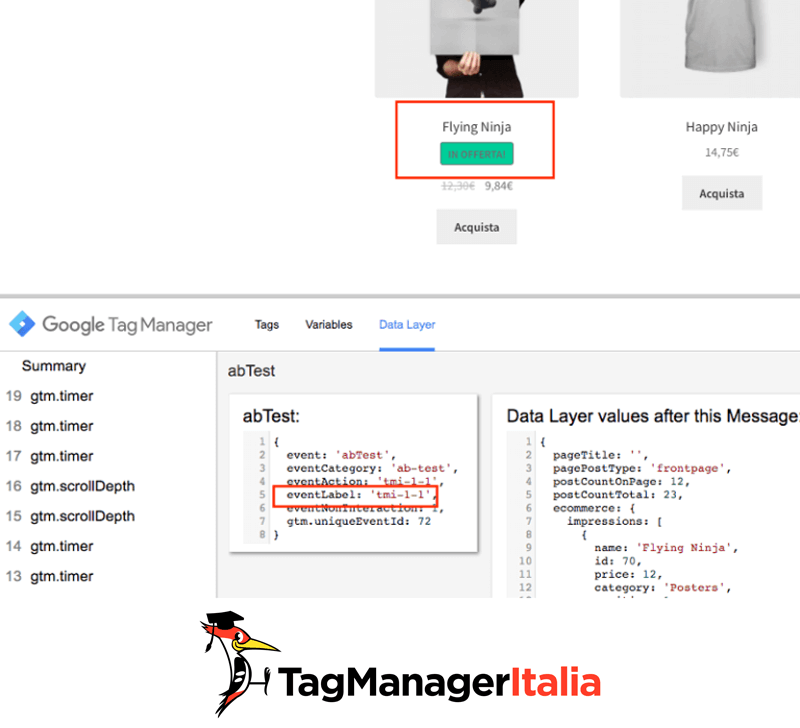
Prima però assicurati che tutto sia stato implementato correttamente, grazie alla funzione Debug e Anteprima.
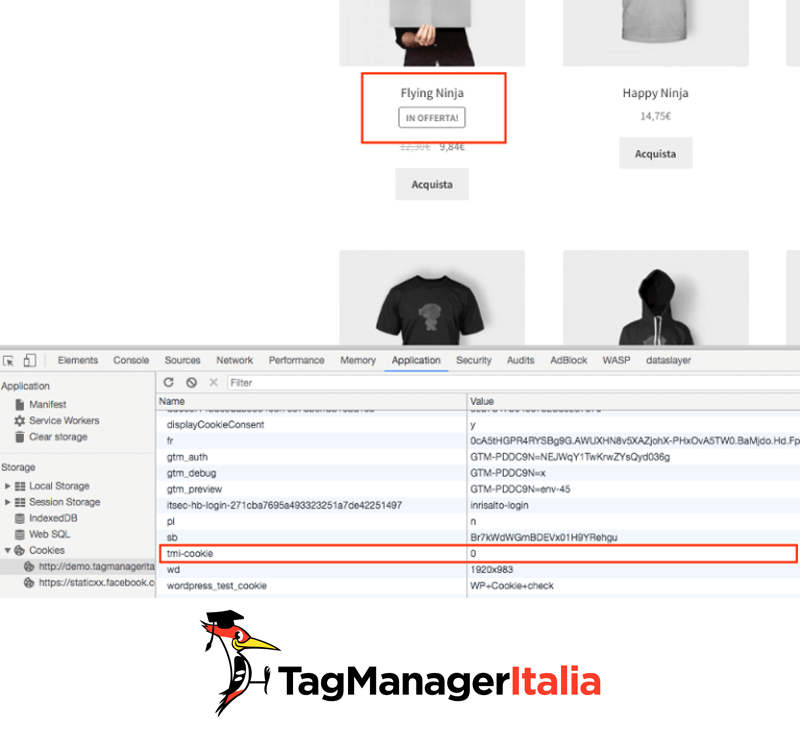
Come vedi dall’immagine l’esperimento è stato lanciato correttamente, all’interno dell’evento “abTest” c’è il numero della variante che ci è stata assegnata e cioè la 1.1. Lo vedi anche dal colore del pulsante 😉
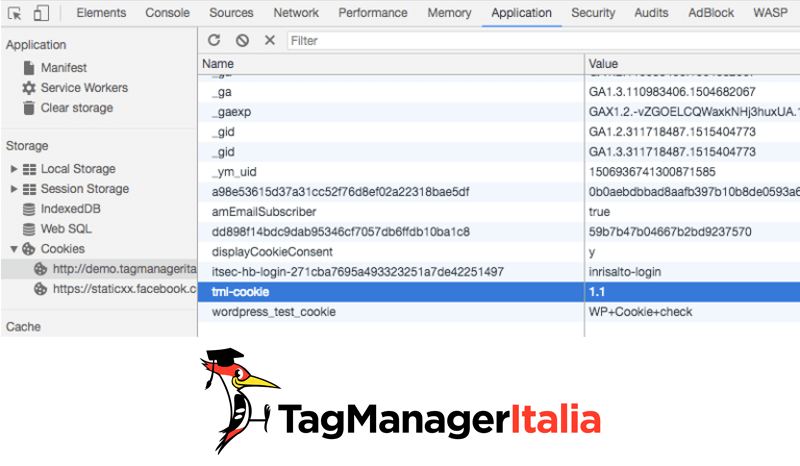
Se vuoi essere sicuro al 100% della tua configurazione, non ti resta che andare all’interno degli strumenti per sviluppatori di Chrome, e vedere se ti è stato assegnato il cookie.
Eccolo! “tmi-cookie” uguale a 1.1 🙂
Se lo cancelli e ricarichi la pagina, dovrebbe ripristinarsi tutto e ti vedrai assegnata l’altra variante, infatti ora “tmi-cookie” uguale a 0.
Che roba figa, eh?
Pubblica tutto cliccando sul pulsante blu “Invia” e divertiti!
Psss… ovviamente per mandare i dati a Google Analytics, ti basterà creare un Tag Evento con all’interno le Variabili “eventCategory” e “eventAction” (che dovrai creare come Variabili di livello dati).
Crea il tuo A/B test e raccontami se GTM è un degno sostituto di Google Optimize nei commenti 🙂
(Sorry I can only reply by sending a brand new comment)
So this script actually decides whether a user will see the variant or the original version based on the random number being either odd or even, right? I wondered if it’s possible to incorporate a “random number matches regex ^\d+[1-7]” kind of formula so we can show variant to the 70%, instead of going 50-50. I don’t know how, though 🙂 Cheers.
Onder
18 01 2018
Of course ^\d+[1-7]$ would be the proper one.
Matteo Zambon
19 01 2018
Hello Onder, you can create your own formula and insert it in the script instead of the randon number.
Hey. I’ve been following your posts for some time now. Thanks for the guide. I had to use Google Translate, of course; but I have a question anyway 🙂
How does this method specify what percentage of the users will see the original and what percentage will see the original content? I first thought it has something to do with the random number variable but I guess it doesn’t. Would it work if we employed a random number matches regex condition in the pageview trigger? Thanks.
Matteo Zambon
18 01 2018
Hi Onder 🙂
It is a real pleasure that you read Tag Manager Italia 🙂
Yours is a very good question. Statistically with the increase in visitors the probability that they become 50% becomes more real.
If you want the certainty you should save on a database the number of visitors and assign the value different from the previous one.
The solution with the regex condition is statistically the same because the condition that decides test A from test B is the random number (odd or even).
What do you think about it?
Hai ancora qualche dubbio? Chiedi pure qui sotto, sarò pronto a risponderti!


 a Google Analytics 4 (GA4)")


Onder
18 01 2018
(Sorry I can only reply by sending a brand new comment)
So this script actually decides whether a user will see the variant or the original version based on the random number being either odd or even, right? I wondered if it’s possible to incorporate a “random number matches regex ^\d+[1-7]” kind of formula so we can show variant to the 70%, instead of going 50-50. I don’t know how, though 🙂 Cheers.
Onder
18 01 2018
Of course ^\d+[1-7]$ would be the proper one.
Matteo Zambon
19 01 2018
Hello Onder, you can create your own formula and insert it in the script instead of the randon number.
This is the line code:
var randomChange = randomNumber% variants.length;
Onder
17 01 2018
Hey. I’ve been following your posts for some time now. Thanks for the guide. I had to use Google Translate, of course; but I have a question anyway 🙂
How does this method specify what percentage of the users will see the original and what percentage will see the original content? I first thought it has something to do with the random number variable but I guess it doesn’t. Would it work if we employed a random number matches regex condition in the pageview trigger? Thanks.
Matteo Zambon
18 01 2018
Hi Onder 🙂
It is a real pleasure that you read Tag Manager Italia 🙂
Yours is a very good question. Statistically with the increase in visitors the probability that they become 50% becomes more real.
If you want the certainty you should save on a database the number of visitors and assign the value different from the previous one.
The solution with the regex condition is statistically the same because the condition that decides test A from test B is the random number (odd or even).
What do you think about it?